


TACTICAL ANALYSIS: How Gor's efficiency in transitions left Shabana licking wounds at Nyayo Stadium

.jpg)

.jpg)
.jpg)


Reading Time: 6min | Sun. 22.03.26. | 18:45
While the scoreline suggests a close encounter, the underlying tactical story reveals how Gor Mahia consistently manipulated space - particularly in wide areas - and controlled key phases of the game despite Shabana’s resilience
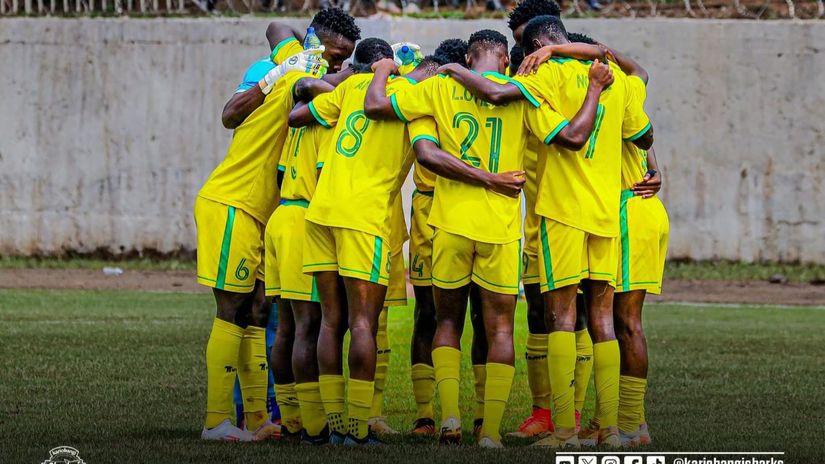
Gor Mahia secured a hard-fought 2-1 victory over Shabana in a match defined by transitional sharpness, wide overloads and aggressive midfield battles.
While the scoreline suggests a close encounter, the underlying tactical story reveals how Gor Mahia consistently manipulated space - particularly in wide areas - and controlled key phases of the game despite Shabana’s resilience.
Follow Our WhatsApp Channel For More News
From the outset, both teams set up in variations of a 4-3-3 structure, though their interpretations differed significantly in behaviour and intent.
Gor Mahia’s back four featured: Paul Ochuoga at right-back, Bryton Onyona on the left and a central defensive pairing of Frank Odhiambo alongside Mike Kibwage.
The four were supported by a midfield trio where Alpha Onyango and Enock Morrison alternated in deeper roles, while Jackson Dwang operated with more forward intent.

Their front three provided width and vertical threat, with Sharif Musa and Samuel Kapen frequently interchanging flanks to destabilize defensive references, while Ebenezer Aduk-Waw led the line as the central striker.
Gad Mathews was in between the Gor Mahia sticks.
Shabana mirrored the 4-3-3 on paper but adopted a more fluid attacking structure, with Stephen Ochieng in goal.
Their defensive unit consisted of full-backs Brian Bett and James Mazembe, flanking centre-backs George Onyango and Wycliffe Omondi.
In midfield, Biron Otieno and Kevin Omundi operated behind Keith Imbali, who played in a more advanced role.
In attack, Brian Michira started from the left but frequently drifted into central areas and across the frontline, interchanging with Bronson Nsubuga on the right.
Bathsi Assis spearheaded the attack as the nominal striker, often dropping deeper to link play.
Out of possession, Shabana implemented an aggressive, semi-man-oriented defensive scheme.
Their midfielders stepped forward to engage Gor Mahia’s central players, while defenders were willing to follow runners out of the backline.
This approach aimed to disrupt rhythm and prevent clean progression through central areas.
However, such man-oriented tendencies inherently carry risk - particularly when facing a team capable of coordinated rotations.
Gor Mahia quickly identified and exploited this. By encouraging Shabana’s defenders to step out, they created vacated spaces in deeper defensive zones.
The key issue for Shabana was not the intent of their press, but the lack of compactness once individuals were drawn out of position.
This became a recurring vulnerability that Gor Mahia would target through multiple attacking patterns.
In build-up, both teams initially opted for direct play, frequently going long from restarts to avoid costly turnovers in dangerous zones.
This reflected mutual respect for each other’s attacking quality. Shabana’s long balls were typically aimed at Assis, who acted as a reference point for aerial duels, with wide players positioned to collect second balls.
Gor Mahia, meanwhile, used long diagonals from their centre-backs to access wide areas quickly, bypassing midfield congestion.
As the game progressed, Gor Mahia introduced more structured build-up mechanisms.
Alpha or Morrisson began dropped between or alongside to assist the centre-backs in the low phase build up, allowing full-backs - particularly Ochuoga - to advance higher.
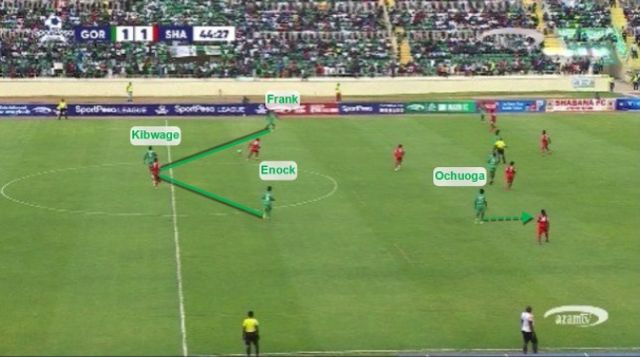
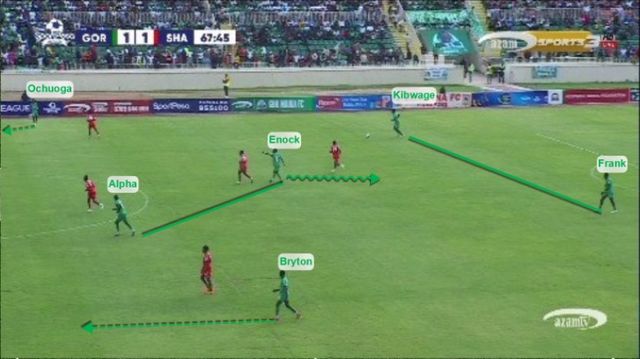
This created asymmetry in their structure, with overloads forming on one side while isolations were engineered on the opposite flank.
A notable pattern involved overloading the left side with midfield support and the full-back, drawing Shabana’s defensive attention, before switching play to the right where Ochuoga could exploit space and deliver crosses to the box.
These rotations forced constant decision-making dilemmas for Shabana’s defenders: step out and leave space behind, or hold shape and allow progression.
Too often, they chose the former, and Gor Mahia capitalized.

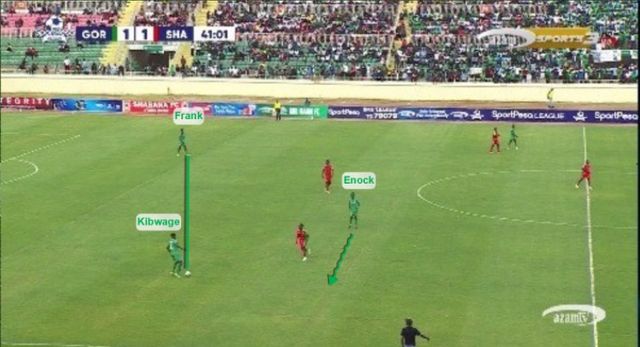
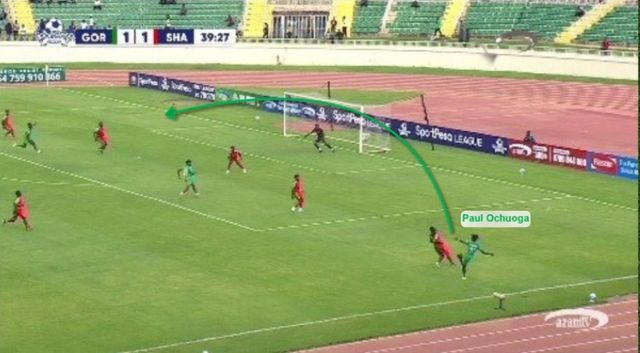
The opening goal originated from a transitional moment, Gor Mahia advanced quickly through central carrying via Aduk-waw before releasing the ball into the right channel.
The defensive disorganization during Shabana’s retreat allowed Dwang to isolate his marker, creating separation excellently and finishing clinically with his left foot.
While the goal itself came from individual brilliance, it was enabled by structural imbalance during transition - a recurring theme.
Afterwards, Shabana’s equaliser came from a well-rehearsed, direct restart approach, where they quickly launched the ball forward immediately after conceding to catch Gor Mahia unsettled.
The delivery into the box targeted Bathsi Assis, whose aerial challenge - despite missing the ball - created confusion among the defenders, leading to a misdirected flick into a dangerous area.
Anticipating this moment, Omondi had already surged forward from defence, arriving unmarked behind the line to react first and finish, capitalising on the disorganisation caused by the initial duel.
A key tactical battleground throughout the match was the midfield.
Both teams engaged in intense duels, with little time or space afforded on the ball.
Shabana attempted to generate chances through combinations and occasional long-range efforts, but Gor Mahia’s midfield compactness - particularly the proximity between Morrison and Alpha - helped limit clean progression.
Zone occupation further explains the difference between the sides. Gor Mahia consistently found access to wide channels and half-spaces, especially through the pace and directness of Sharif Musa.
By contrast, Shabana struggled to consistently access central danger zones, often resorting to speculative shots from distance.
This imbalance in zone control translated into higher-quality chances for Gor Mahia.
Without the ball, Gor Mahia displayed a well-coordinated pressing structure, often resembling a 4-4-2 shape with one forward dropping alongside a midfielder.
Their pressing triggers were clear: backward passes and wide receptions prompted immediate pressure, with curved runs designed to block central passing lanes and force play toward the flanks.
Once the ball was directed wide, they engaged aggressively, aiming to either win possession or force hurried clearances.
This pressing approach disrupted Shabana’s attempts to build from the back, compelling them to revert to long balls. Importantly, Gor Mahia were well-prepared for these scenarios, positioning players to contest second balls and quickly re-establish attacking phases.

Equally significant was Gor Mahia’s rest-defence structure. Even when committing numbers forward, they maintained sufficient coverage behind the ball.
The positioning of their midfielders ensured that transitions were quickly suppressed, preventing Shabana from exploiting open spaces.
This control mechanism limited Shabana’s ability to launch effective counterattacks, forcing them into less efficient attacking routes.
The second half introduced subtle tactical adjustments. Shabana began incorporating more controlled midfield circulation, attempting to build attacks with shorter passes before progressing wide.
This improved their ability to sustain possession temporarily, but it also reduced the directness that had previously unsettled Gor Mahia.
Substitutions further altered dynamics. Gor Mahia introduced Ebenezer Assifuah, an out and out striker profile, shifting their attacking focal point and allowing wider players to operate differently.
Shabana, on the other hand, reinforced their wide presence and attacking depth, signaling intent to chase the game bringing on Pape Diallo and Austin Odongo.
Despite these changes, the decisive moment came from a set-piece. Gor Mahia exploited near-post space from a corner, where Alpha Onyango’s flick header ultimately resulted in the winning goal.
This highlighted another recurring theme: their ability to generate threat not only from open play but also from structured dead-ball situations.
In the final stages, game state dictated behaviour. Gor Mahia transitioned into a more conservative approach, prioritizing control and disruption over expansion.
Tactical fouling and tempo management played a key role in breaking Shabana’s rhythm.
Shabana, meanwhile, pushed forward in search of an equalizer but lacked the structural clarity to consistently break down a now compact defensive block.

Defensively, Gor Mahia remained organized, with clear stepping triggers and effective recovery runs. Their compactness between lines limited central access, forcing Shabana into wide or speculative attacks.
In conclusion, this match was shaped by Gor Mahia’s superior structural adaptability and their ability to repeatedly exploit Shabana’s defensive approach.
By combining wide overloads, intelligent rotations, and effective pressing, they consistently created advantageous situations.
Shabana’s approach, while aggressive and at times effective in transition, ultimately lacked the positional discipline and control required to sustain pressure or prevent exploitation.
The narrow scoreline reflects Shabana’s competitiveness, but tactically, Gor Mahia demonstrated a more complete and coherent game model - one that balanced attacking ambition with defensive stability to secure a deserved victory.